


大概是三年前我自己设计了 XTestRunner 测试报告,主要是针对unittest 单元测试框架而设计。
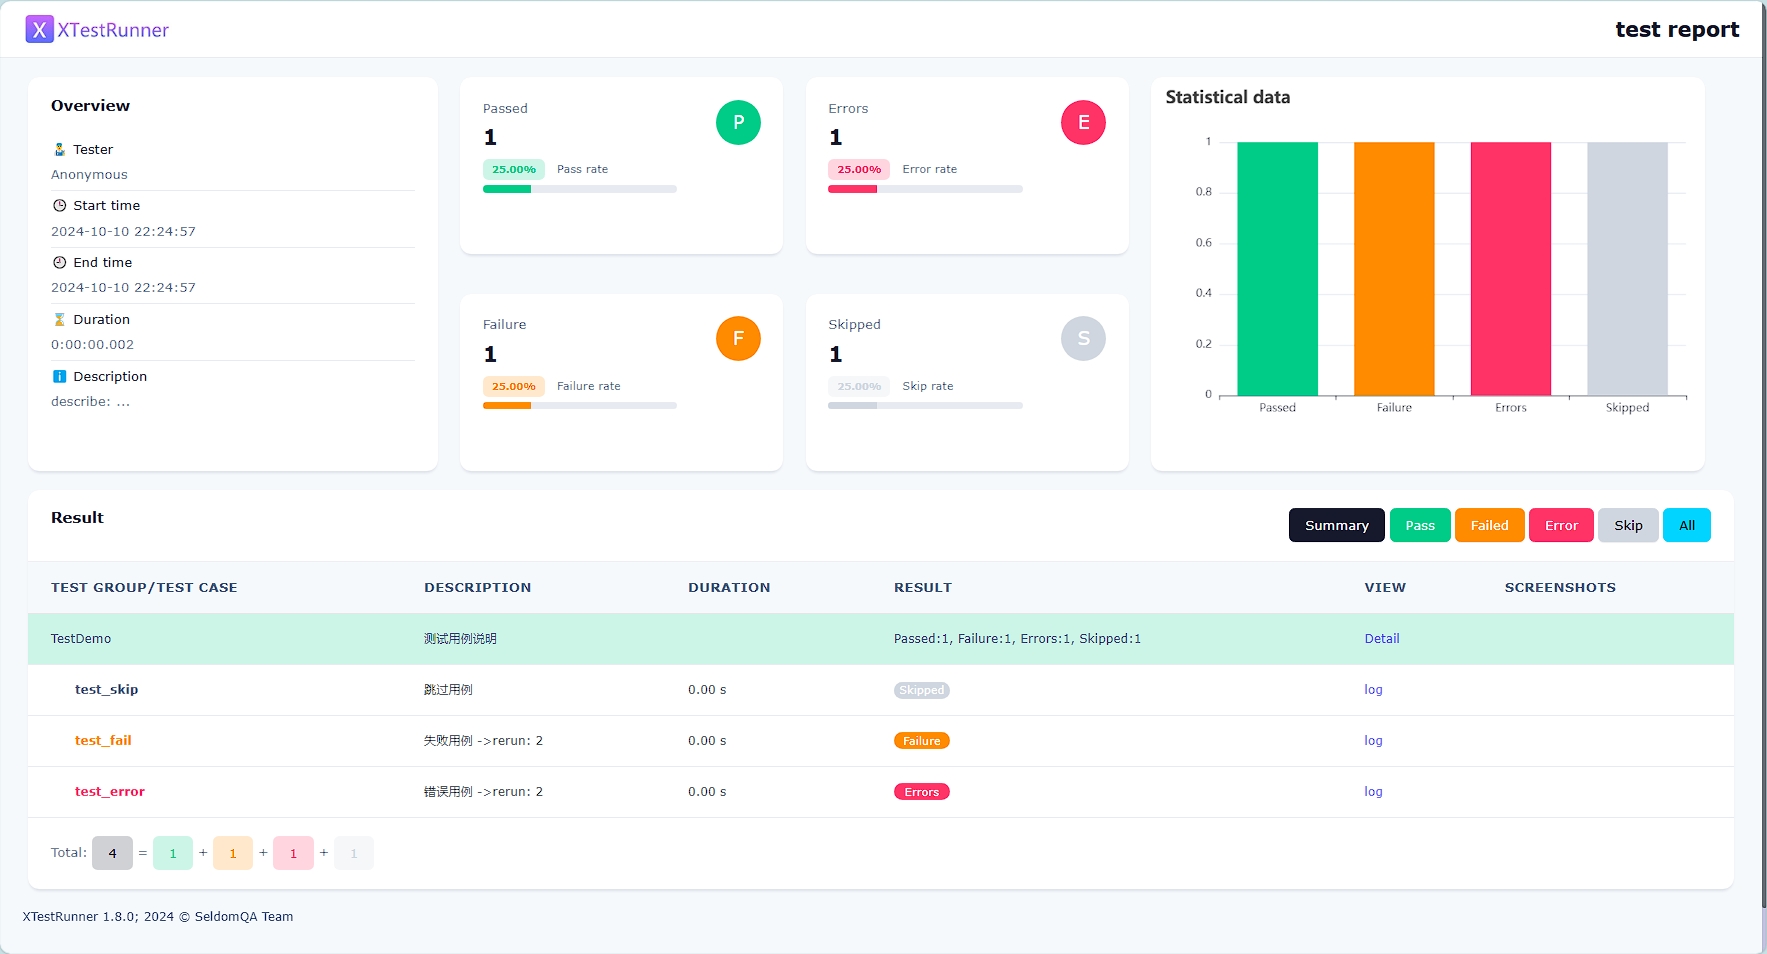
记得当时主要是被一个网友安利说 UnitTestReport 好看,这我就非常不服气了,你可以质疑我的技术能力,但是不能质疑我的审美,于是重新设计了XTestRunner并发布了 1.0 版本。至今为止,XTestRunner仍然是 unittest 最漂亮的第三方测试报告。
然而, 网友墙裂建议针对 pytest 单元测试框架支持一波,我当时专心搞seldom框架,才没心情支持。现在,终于乘上了了 XTestRunner 的 pytest 版本。
为什么要选择 pytest-xhtml?
Allure报告
:需要额外安装Allure命令行工具,启动服务过于重量级,看个报告还要每台电脑都安装Allure命令。pytest-html
:界面太丑,这个看脸的世界,丑就是原罪。
pytest-xhtml特点
-
pytest-xhtml 基于
XTestRunner
的设计风格,将现代Web UI设计理念引入测试报告领域,实现了功能与美学的完美平衡。 - 这句是AI生成的。 -
pytest-xhtml 基于
pytest-html
魔改UI, 功能使用上与 pytest-html 保持一致,除了命名上有差异。使用 pytest-xhtml的时候,请卸载 pytest-html
。
安装方式
- pip命令安装
# 安装 pip install pytest-xhtml #下面的示例会用到 pip install pytest-req pip install selenium 使用方式
- 核心使用 - 与 pytest-html 完全一致
pytest --html=report.html 简单的单元测试
首先,配置 conftest.py文件,配置只是为了多显示两列内容,不配置也行。
import pytest from datetime import datetime, timezone def pytest_xhtml_results_table_header(cells): cells.insert(2, "<th>Description</th>") cells.insert(1, '<th data-column-type="time">Time</th>') def pytest_xhtml_results_table_row(report, cells): cells.insert(2, f"<td>{report.description}</td>") cells.insert(1, f'<td class="col-time">{datetime.now(timezone.utc)}</td>') @pytest.hookimpl(hookwrapper=True) def pytest_runtest_makereport(item, call): outcome = yield report = outcome.get_result() if hasattr(report, 'nodeid') and '::' in report.nodeid: report.description = str(item.function.__doc__ or "No description") 然后,编写测试用例 test_sample.py。
import pytest # 简单的测试用例 def test_pass(): assert 1 + 1 == 2 def test_fail(): assert 1 + 1 == 3 def test_skip(): pytest.skip("这个测试被跳过") @pytest.mark.xfail def test_xfail(): assert 1 + 1 == 3 @pytest.mark.xfail(reason="预期失败,但实际会通过") def test_xpass(): """这是一个 Unexpected passes 用例 - 预期失败但实际通过""" assert 1 + 1 == 2 def test_error(): """这是一个 Error 用例 - 测试执行时发生异常""" # 故意引发一个异常来模拟错误 raise ValueError("模拟测试执行错误") @pytest.fixture def error_fixture(): # 在fixture中引发异常,也会导致测试错误 raise RuntimeError("fixture中的错误") def test_error_with_fixture(error_fixture): """使用会出错的fixture的测试用例""" assert True if __name__ == '__main__': pytest.main(["-v", "--html=report.html", "test_sample.py"]) 最后,运行测试用例。
pytest -v --html=report.html test_sample.py 
HTTP接口测试
首先,配置 conftest.py文件,主要是为了显示接口调用日志信息。
import pytest from datetime import datetime, timezone from datetime import datetime, timezone from pytest_req.log import log_cfg @pytest.fixture(scope="session", autouse=True) def setup_log(): """ setup log """ log_format = "<green>{time:YYYY-MM-DD HH:mm:ss}</> |<level> {level} | {message}</level>" log_cfg.set_level(format=log_format) def pytest_xhtml_results_table_header(cells): cells.insert(2, "<th>Description</th>") cells.insert(1, '<th data-column-type="time">Time</th>') def pytest_xhtml_results_table_row(report, cells): cells.insert(2, f"<td>{report.description}</td>") cells.insert(1, f'<td class="col-time">{datetime.now(timezone.utc)}</td>') @pytest.hookimpl(hookwrapper=True) def pytest_runtest_makereport(item, call): outcome = yield report = outcome.get_result() if hasattr(report, 'nodeid') and '::' in report.nodeid: report.description = str(item.function.__doc__ or "No description") 然后,编写测试用例test_req.py。
def test_post_method(post): """ test post request """ s = post('https://httpbin.org/post', data={'key': 'value'}) assert s.status_code == 200 def test_get_method(get): """ test get request """ payload = {'key1': 'value1', 'key2': 'value2'} s = get("https://httpbin.org/get", params=payload) assert s.status_code == 200 ... 最后,运行测试用例。
pytest -v --html=report.html test_sample.py 
Selenium UI测试
首先,配置 conftest.py文件, 主要是为了实现截图展示。
import pytest from datetime import datetime, timezone from selenium import webdriver @pytest.fixture def driver(): """提供 WebDriver 实例用于测试""" driver = webdriver.Edge() yield driver driver.quit() def pytest_xhtml_results_table_header(cells): cells.insert(2, "<th>Description</th>") cells.insert(1, '<th data-column-type="time">Time</th>') def pytest_xhtml_results_table_row(report, cells): cells.insert(2, f"<td>{report.description}</td>") cells.insert(1, f'<td class="col-time">{datetime.now(timezone.utc)}</td>') @pytest.hookimpl(hookwrapper=True) def pytest_runtest_makereport(item, call): outcome = yield report = outcome.get_result() # 只为测试用例添加描述,不处理收集阶段的报告 if hasattr(report, 'nodeid') and '::' in report.nodeid: report.description = str(item.function.__doc__ or "No description") # 当测试失败时添加截图 if report.when == "call" and report.failed: # 获取当前测试的 driver fixture driver = item.funcargs.get('driver') if driver: # 使用 base64 编码获取截图 screenshot_base64 = driver.get_screenshot_as_base64() # 将截图添加到报告额外信息中 - 使用 pytest-xhtml 期望的格式 if not hasattr(report, 'extras'): report.extras = [] # 使用 pytest-xhtml 支持的格式 report.extras.append({ 'name': 'Screenshot', 'format_type': 'image', # 必需字段 'content': screenshot_base64, # base64 内容 'mime_type': 'image/png', # 必需字段 'extension': 'png' # 必需字段 }) 然后,编写测试用例test_req.py。
from time import sleep from selenium.webdriver.common.by import By def test_bing_search_fail(driver): """测试 Bing 搜索功能""" # 访问 Bing 搜索页面 driver.get("https://www.bing.com") sleep(2) assert driver.title == "pytest-xhtml - 搜索11" ... 最后,运行测试用例。
pytest -v --html=report.html test_selenium.py 
最后说明
pytest-xhtml 调样式前后花费了一周(晚上)时间,相比较 XTestRunner 缺失一些统计图表。后面再慢慢增加吧!功能上可以完全替代 pytest-html 了,快去体验一下吧!


这一切,似未曾拥有