
从EXTI实现看Embassy: 异步Rust嵌入式框架
从EXTI实现看Embassy: 异步Rust嵌入式框架
原文链接:https://decaday.github.io/blog/embassy-exti/
Embassy是一个基于Rust的异步嵌入式开发框架:
Embassy: The next-generation framework for embedded applications
Embassy不仅包含了异步运行时,还提供了STM32、RP2xxx,NRF等芯片的异步HAL实现、usb、[蓝牙(trouble)](embassy-rs/trouble: A Rust Host BLE stack with a future goal of qualification.)等,乐鑫官方的esp-rs也是将embassy作为默认框架使用。
最近研究了embassy-stm32的部分实现,写在博客里作为记录吧。Exti最简单也有点Async味,就先写这个吧。
注意:本文撰写时,Embassy尚未1.0 release,此文可能在您读的时候已经过时。为了博客的清晰,部分代码被简化。
EXTI
EXTI
是 Extended Interrupts and Events Controller 的缩写,即“扩展中断和事件控制器”。它的核心作用可以概括为一句话:让STM32能够响应来自外部(或内部通道)的异步信号,如IO上升沿、IO高电平,并在这些事件发生时触发中断或事件请求,从而执行特定的任务,尤其擅长将MCU从低功耗模式中唤醒。
embassy-stm32的exti驱动,我们从顶向下看。
源码链接:embassy/embassy-stm32/src · embassy-rs/embassy
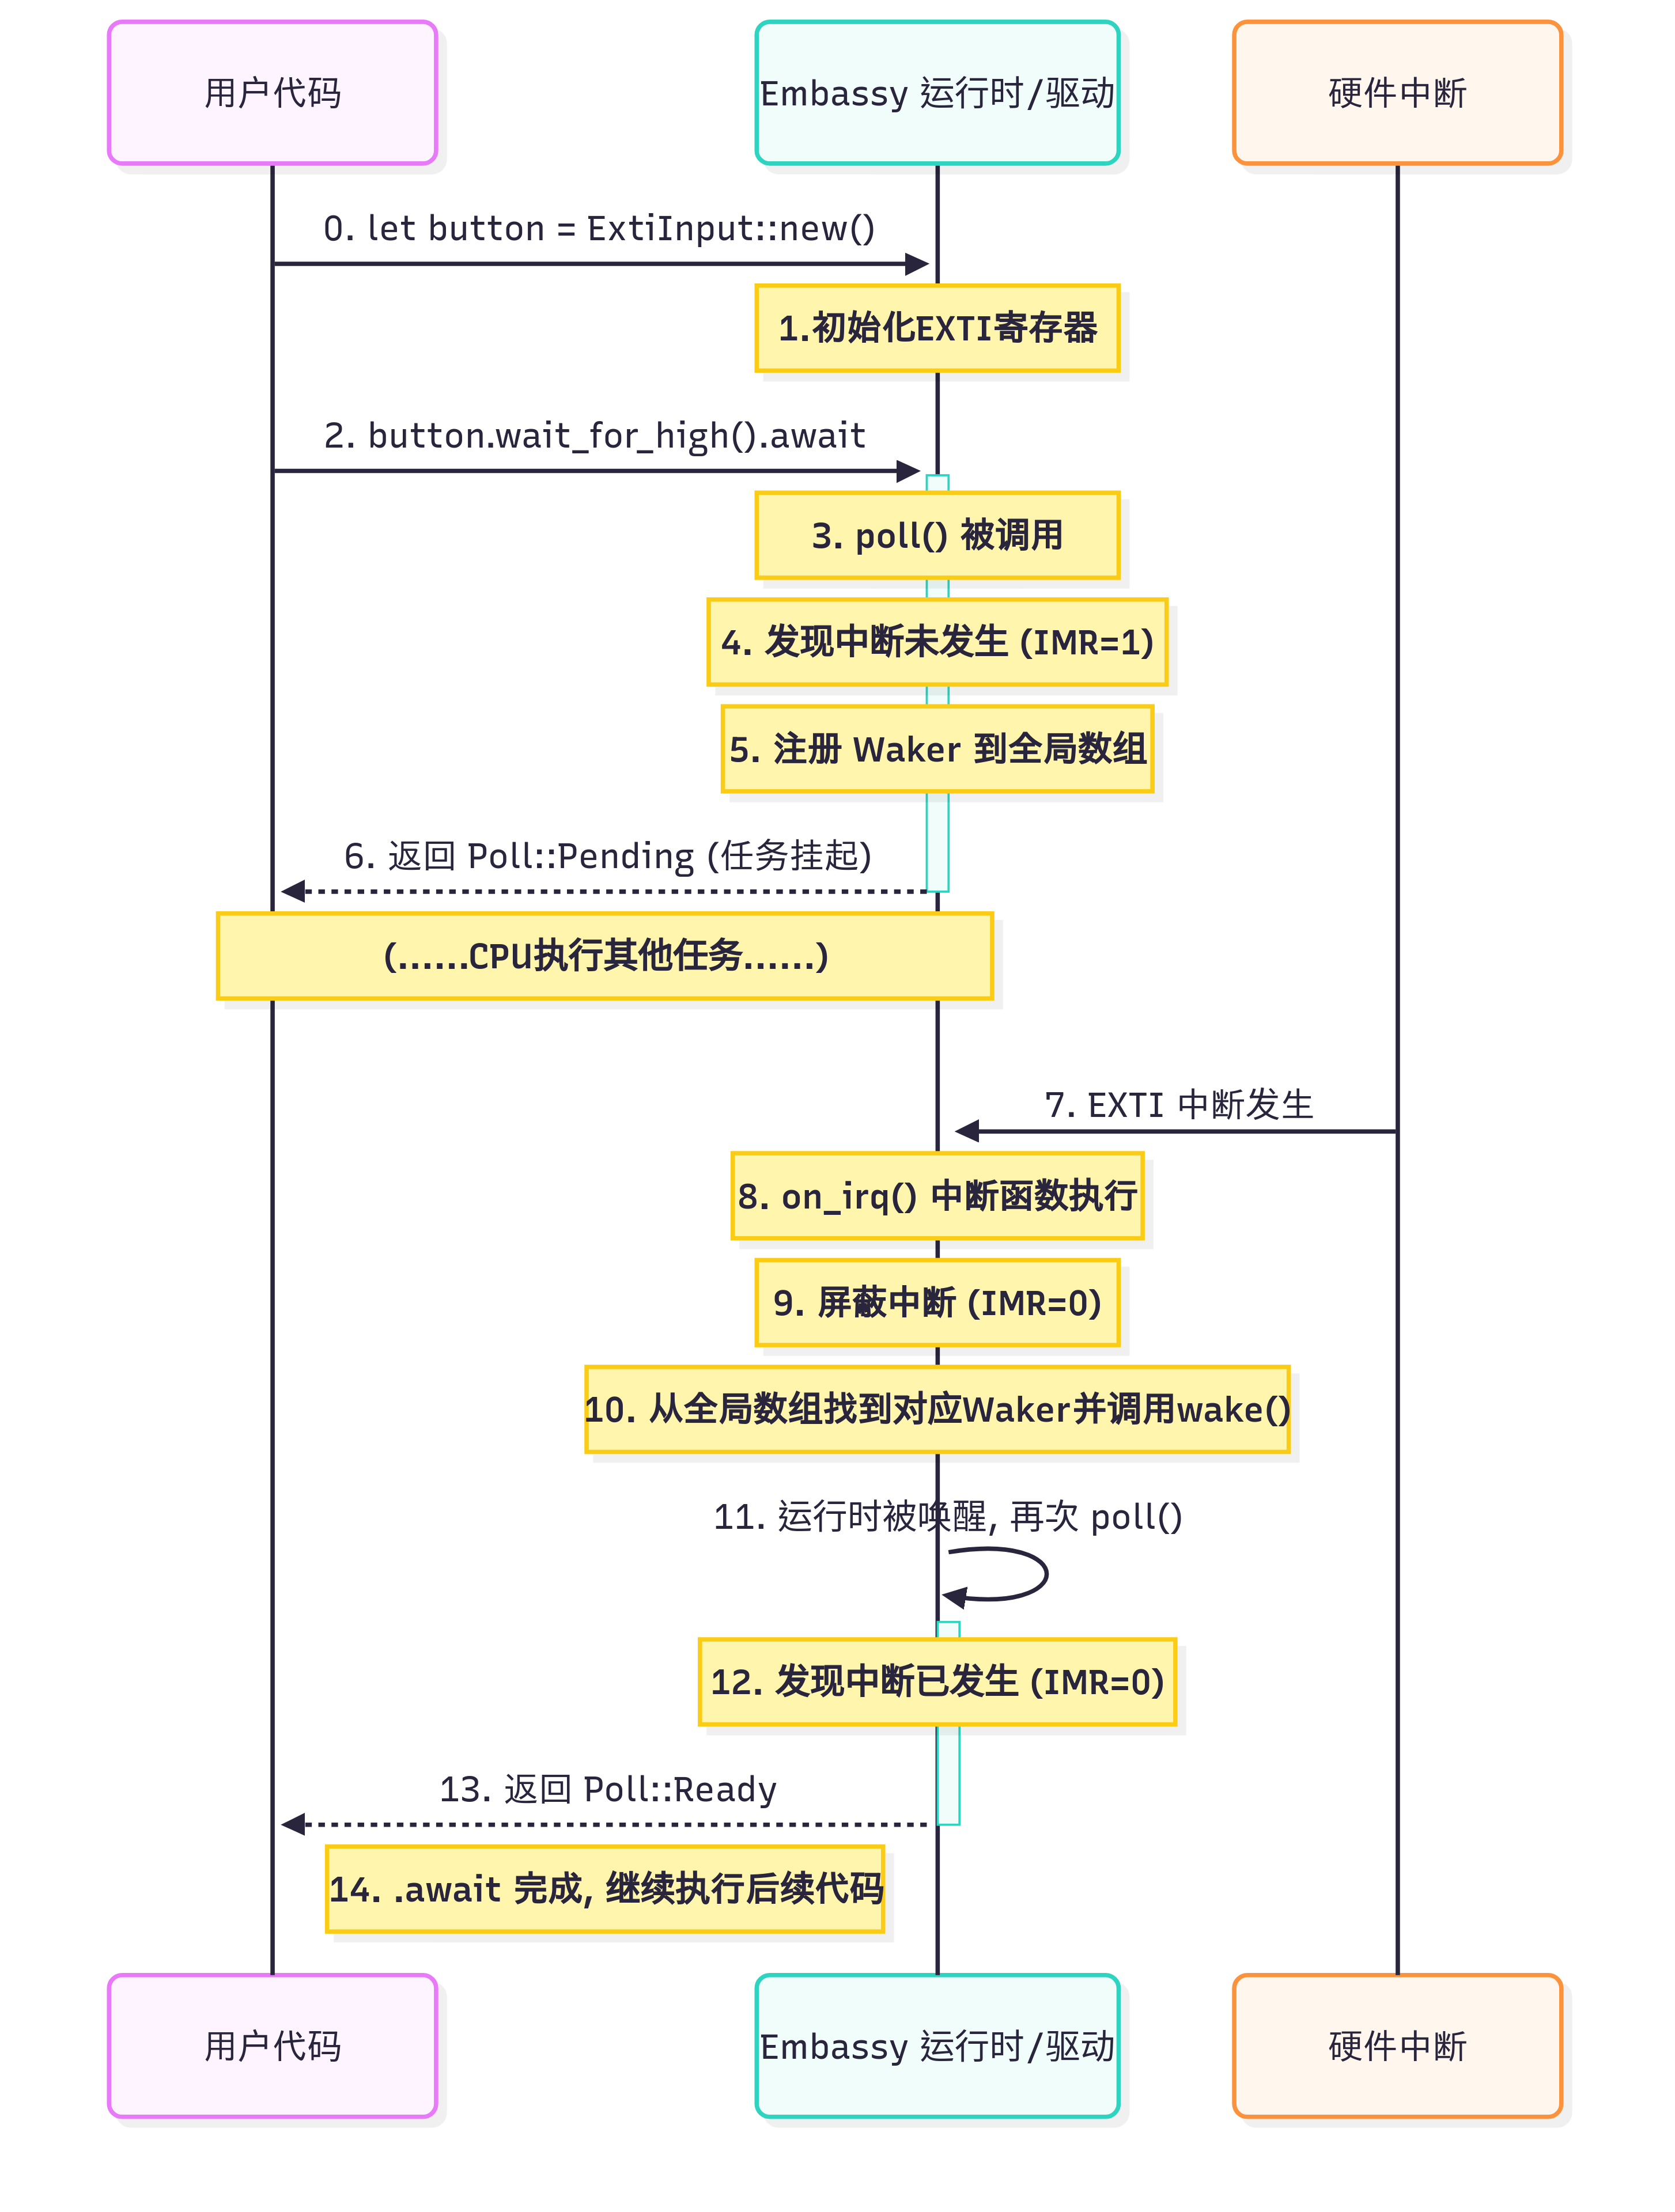
整个代码的逻辑如下:
ExtiInput<'d>
/// EXTI input driver. /// /// This driver augments a GPIO `Input` with EXTI functionality. EXTI is not /// built into `Input` itself because it needs to take ownership of the corresponding /// EXTI channel, which is a limited resource. /// /// Pins PA5, PB5, PC5... all use EXTI channel 5, so you can't use EXTI on, say, PA5 and PC5 at the same time. pub struct ExtiInput<'d> { pin: Input<'d>, } 这是可被用户直接使用的ExtiInput类型。
其内部包含了一个Input类型(其实Input类型内部也是包含了一个FlexPin类型)
构造函数
impl<'d> ExtiInput<'d> { /// Create an EXTI input. pub fn new<T: GpioPin>( pin: impl Peripheral<P = T> + 'd, ch: impl Peripheral<P = T::ExtiChannel> + 'd, pull: Pull, ) -> Self { into_ref!(pin, ch); // Needed if using AnyPin+AnyChannel. assert_eq!(pin.pin(), ch.number()); Self { pin: Input::new(pin, pull), } } ... new函数我们主要说一下 impl Peripheral<P = T::ExtiChannel>:
impl Peripheral<...>: 表明pin必须是一个实现了Peripheraltrait 的类型。Peripheral用来标记硬件外设所有权,来自embassy-hal-internal。<P = T>: 这是一个关联类型约束,意味着这个外设的实体类型就是泛型T(比如peripherals::PA4)。<P = T::ExtiChannel>:T::ExtiChannel是TraitT的关联类型,这个我们将在下面看到。它意味着这个外设的实体类型要与 “与T对应的ExtiChannel” 的类型匹配。+ 'd: 这是一个生命周期约束,确保传入的外设引用至少和ExtiInput实例活得一样长。这在处理外设的可变借用时非常重要。
这个类型限制是这样的:
T是GpioPin,是某个引脚的类型(比如PA4,PA5,都是单独的类型,都可以是T)
pin 参数要走了 T 的所有权,目的是使得用户无法直接将PA4再用作I2C。其形式通常是单例Singleton,也就是传统rust hal库结构的let p = Peripheral.take() 所获得的外设的所有权(以后可能单独写博客讲单例)。
ch 参数限定了其自身必须是T的关联类型ExtiChannel (P = T::ExtiChannel),我们在下面细说,这要求了channel必须与pin对应,比如PA4必须提供EXTI4。
类型系统
EXTI单例(Singleton)类型的定义在_generated.rs(由build.rs生成的)中的embassy_hal_internal::peripherals_definition!宏中。
// (embassy-stm32/target/thumbv7em-none-eabi/.../out/_generated.rs) embassy_hal_internal::peripherals_definition!( ADC1, ... EXTI0, EXTI1, EXTI2, EXTI3, ... ) 这些外设信息来自芯片的CubeMX数据库。经过stm32-data和embassy-stm32宏的层层处理,实现了完善的类型限制和不同型号间高度的代码复用。
Channel Trait
Exit的Channel Trait使用了密封(Sealed)Trait,这样可以保证Channel Trait在包外可见,但是不能在外部被实现(因为外部实现privite trait SealedChannel )
trait SealedChannel {} #[allow(private_bounds)] pub trait Channel: SealedChannel + Sized { /// Get the EXTI channel number. fn number(&self) -> u8; /// Type-erase (degrade) this channel into an `AnyChannel`. /// /// This converts EXTI channel singletons (`EXTI0`, `EXTI1`, ...), which /// are all different types, into the same type. It is useful for /// creating arrays of channels, or avoiding generics. fn degrade(self) -> AnyChannel { AnyChannel { number: self.number() as u8, } } } 在实现上比较简单,embassy-stm32使用宏来简化了代码。
macro_rules! impl_exti { ($type:ident, $number:expr) => { impl SealedChannel for peripherals::$type {} impl Channel for peripherals::$type { fn number(&self) -> u8 { $number } } }; } impl_exti!(EXTI0, 0); impl_exti!(EXTI1, 1); impl_exti!(EXTI2, 2); impl_exti!(EXTI3, 3); // ... Pin Trait
Pin Trait同样使用了Sealed Trait。AnyPin部分我们先不研究,我们只看Exti部分:Pin Trait设置了一个关联类型,指向exti::Channel Trait。
// embassy-stm32/src/gpio.rs pub trait Pin: Peripheral<P = Self> + Into<AnyPin> + SealedPin + Sized + 'static { /// EXTI channel assigned to this pin. For example, PC4 uses EXTI4. #[cfg(feature = "exti")] type ExtiChannel: crate::exti::Channel; #[inline] // Number of the pin within the port (0..31) fn pin(&self) -> u8 { self._pin() } #[inline] // Port of the pin fn port(&self) -> u8 { self._port() } /// Type-erase (degrade) this pin into an `AnyPin`. /// /// This converts pin singletons (`PA5`, `PB6`, ...), which /// are all different types, into the same type. It is useful for /// creating arrays of pins, or avoiding generics. #[inline] fn degrade(self) -> AnyPin { AnyPin { pin_port: self.pin_port(), } } } 在Impl上也是用了大量的codegen和宏,其最终是 foreach_pin 这个宏:(foreach_pin的原型在build.rs生成的_macro.rs内,稍微有点绕,不再详细叙述)
// (embassy-stm32/src/gpio.rs) foreach_pin!( ($pin_name:ident, $port_name:ident, $port_num:expr, $pin_num:expr, $exti_ch:ident) => { impl Pin for peripherals::$pin_name { #[cfg(feature = "exti")] type ExtiChannel = peripherals::$exti_ch; } impl SealedPin for peripherals::$pin_name { /* ... */} impl From<peripherals::$pin_name> for AnyPin { /* ... */} }; ); 其它IO复用也是通过codegen和宏实现的。比如,经过数据处理后,可能生成这样的代码:
// (_generated.rs) impl_adc_pin!(ADC3, PC2, 12u8); impl_adc_pin!(ADC3, PC3, 13u8); pin_trait_impl!(crate::can::RxPin, CAN1, PA11, 9u8); pin_trait_impl!(crate::can::TxPin, CAN1, PA12, 9u8); 这种情况下就限制死了alternate function,从而在编译期就能发现问题,而且通过代码提示就能获知可用的IO而不用翻手册。不得不说,这就是人们希望类型系统所做到的!
wait_for_high
/// Asynchronously wait until the pin is high. /// /// This returns immediately if the pin is already high. pub async fn wait_for_high(&mut self) { let fut = ExtiInputFuture::new(self.pin.pin.pin.pin(), self.pin.pin.pin.port(), true, false); if self.is_high() { return; } fut.await } ... /// Asynchronously wait until the pin sees a rising edge. /// /// If the pin is already high, it will wait for it to go low then back high. pub async fn wait_for_rising_edge(&mut self) { ExtiInputFuture::new(self.pin.pin.pin.pin(), self.pin.pin.pin.port(), true, false).await } ... 这个self.pin.pin.pin.pin()有够吐槽的。解释起来是这样的: ExtiInput.Input.FlexPin.PeripheralRef<AnyPin>.pin()。
我们看见的wait_for_high或是wait_for_rising_edge新建了一个ExtiInputFuture,我们来看看:
ExtiInputFuture<'a>
#[must_use = "futures do nothing unless you `.await` or poll them"] struct ExtiInputFuture<'a> { pin: u8, phantom: PhantomData<&'a mut AnyPin>, } ExtiInputFuture并不存储外设实例,而只存一个pin_num,这有利于所有权的编写和更加灵活。实际上,STM32也只有16个Channel嘛,我们可以用一些全局标志位。
new和drop
fn new(pin: u8, port: u8, rising: bool, falling: bool) -> Self { critical_section::with(|_| { let pin = pin as usize; exticr_regs().exticr(pin / 4).modify(|w| w.set_exti(pin % 4, port)); EXTI.rtsr(0).modify(|w| w.set_line(pin, rising)); EXTI.ftsr(0).modify(|w| w.set_line(pin, falling)); // clear pending bit #[cfg(not(any(exti_c0, exti_g0, exti_u0, exti_l5, exti_u5, exti_h5, exti_h50)))] EXTI.pr(0).write(|w| w.set_line(pin, true)); #[cfg(any(exti_c0, exti_g0, exti_u0, exti_l5, exti_u5, exti_h5, exti_h50))] { EXTI.rpr(0).write(|w| w.set_line(pin, true)); EXTI.fpr(0).write(|w| w.set_line(pin, true)); } cpu_regs().imr(0).modify(|w| w.set_line(pin, true)); }); Self { pin, phantom: PhantomData, } } } impl<'a> Drop for ExtiInputFuture<'a> { fn drop(&mut self) { critical_section::with(|_| { let pin = self.pin as _; cpu_regs().imr(0).modify(|w| w.set_line(pin, false)); }); } } new函数使用了一个critical_section。“critical_section::with 创建了一个临界区。在嵌入式系统中,临界区是一段在执行期间不会被中断打断的代码。对于单核微控制器,最简单的实现方式就是临时禁用所有中断(这也是默认实现)。这确保了在配置 EXTI 寄存器这种需要多个步骤的操作时,不会被一个突如其来的中断打乱,从而保证了操作的原子性。
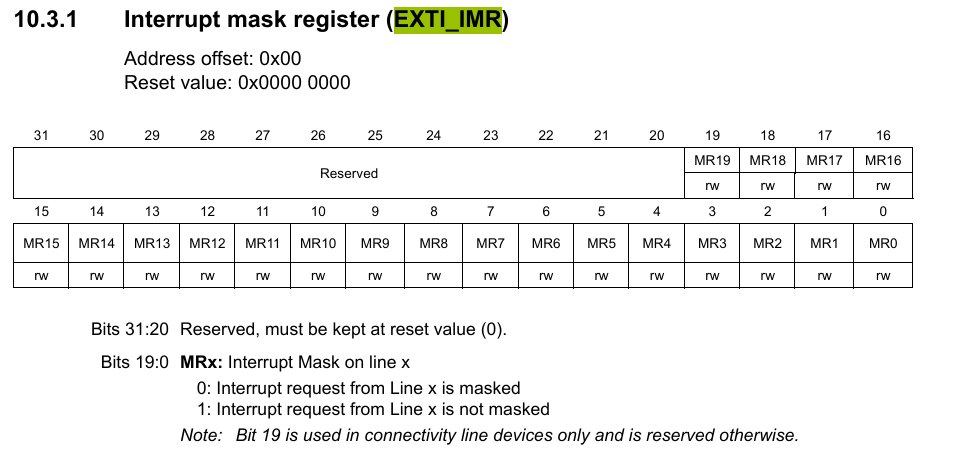
new函数初始化了选择引脚端口、设置触发边沿等与EXTI相关的寄存器(就不展开细看了),最后一行设置了IMR(Interrupt mask register)寄存器,表示取消屏蔽(Mask)该位,此时该通道可产生中断。
impl Future (poll)
const EXTI_COUNT: usize = 16; const NEW_AW: AtomicWaker = AtomicWaker::new(); static EXTI_WAKERS: [AtomicWaker; EXTI_COUNT] = [NEW_AW; EXTI_COUNT]; ... ... impl<'a> Future for ExtiInputFuture<'a> { type Output = (); fn poll(self: Pin<&mut Self>, cx: &mut Context<'_>) -> Poll<Self::Output> { EXTI_WAKERS[self.pin as usize].register(cx.waker()); let imr = cpu_regs().imr(0).read(); if !imr.line(self.pin as _) { Poll::Ready(()) } else { Poll::Pending } } } 在这里我们实现了 Future trait。使得 ExtiInputFuture 可以用于 async/await 机制。
Future trait 代表一个异步计算/运行的结果,可以被执行器(executor)轮询(poll)以检查是否完成。 在 poll 方法中,我们做了以下几件事:
-
注册
: waker是唤醒器。因为持续的轮询会消耗大量的cpu资源(如果持续poll,那就是nb模式)。所以,一个聪明的executor仅第一次和被wakerwaker唤醒后,才会执行一次poll。这里的唤醒者是中断函数。EXTI_WAKERS是一个全局的AtomicWaker数组,每个pin对应一个AtomicWaker,用于存储waker。poll调用时会将waker存入EXTI_WAKERS[self.pine],这样当中断发生时,可以使用这个waker唤醒Future。 -
检查中断是否发生
:它通过检查IMR寄存器判断中断是否发生。因为我们的中断函数(
。所以,如果在on_irq)在触发后会立刻通过imr(0).modify(|w| w.0 &= !bits)来屏蔽该中断线poll时发现IMR位被清零了(即被屏蔽了),就说明在我们await的这段时间里,中断已经来过了。这时就可以返回Poll::Ready了。如果IMR位仍然是1(未屏蔽),则说明中断还没来,返回Poll::Pending继续等待。” 这样就把poll和on_irq的行为联系起来了,逻辑更清晰。
提一下,AtomicWaker这个底层实现在embassy-sync中,平台有Atomic的情况下用AtomicPtr实现,没有的话用Mutex实现。
中断
on_irq
unsafe fn on_irq() { #[cfg(not(any(exti_c0, exti_g0, exti_u0, exti_l5, exti_u5, exti_h5, exti_h50)))] let bits = EXTI.pr(0).read().0; #[cfg(any(exti_c0, exti_g0, exti_u0, exti_l5, exti_u5, exti_h5, exti_h50))] let bits = EXTI.rpr(0).read().0 | EXTI.fpr(0).read().0; // ... // Mask all the channels that fired. cpu_regs().imr(0).modify(|w| w.0 &= !bits); // Wake the tasks for pin in BitIter(bits) { EXTI_WAKERS[pin as usize].wake(); } // Clear pending EXTI.pr(0).write_value(Lines(bits)); ... } on_irq 函数的主要作用是在外部中断发生时,处理触发的 ExtiChannel 并唤醒相应的 Future。
- 读取
PR(Pending Register)或者RPR/FPR(Rising/Falling Edge Pending Register)因为多个EXTI线可能共用一个中断向量,所以on_irq首先读取PR来确定具体是哪些线触发了中断。 - 通过修改
IMR(Interrupt Mask Register),屏蔽已触发的中断通道,以防止重复触发。 - 为了处理多个Channel都触发的情况,Embassy通过
BitIter(bits)遍历所有触发的pin,并调用EXTI_WAKERS[pin as usize].wake()唤醒相应的Future。这个BitIter会在下面讲到。 - 在
EXTI.pr或EXTI.rpr/EXTI.fpr中清除对应的位,以便后续的中断可以正确触发。
绑定
Embassy通过一系列宏将EXTI中断绑定到on_irq上。
macro_rules! foreach_exti_irq { ($action:ident) => { foreach_interrupt!( (EXTI0) => { $action!(EXTI0); }; (EXTI1) => { $action!(EXTI1); }; ... // plus the weird ones (EXTI0_1) => { $action!( EXTI0_1 ); }; (EXTI15_10) => { $action!(EXTI15_10); }; ... ); }; } macro_rules! impl_irq { ($e:ident) => { #[allow(non_snake_case)] #[cfg(feature = "rt")] #[interrupt] unsafe fn $e() { on_irq() } }; } 因为EXTI中断比较复杂,有多个外设共用一个中断向量的情况,而且不同的系列共用中断向量的情况还不一样,在exti上难以使用bind_irqs!这样的模式、embassy_stm32的其它外设,以及embassy_rp等hal都是使用的bind_irqs!。这其实是将更多的中断访问权交给了用户。
但是exti就不行了,想要让hal不占用中断向量,就只能关闭exti feature来关闭整个模块,或者关闭rt feature,自行管理启动和所有中断。
BitIter
struct BitIter(u32); impl Iterator for BitIter { type Item = u32; fn next(&mut self) -> Option<Self::Item> { match self.0.trailing_zeros() { 32 => None, b => { self.0 &= !(1 << b); Some(b) } } } } BitIter 是一个简单的位迭代器,用于遍历 bits 中的所有 1 位。
trailing_zeros() 返回最低有效位(LSB)之前 0 的个数。然后self.0 &= !(1 << b) 清除该位,以便在下一次 next() 调用时继续遍历。
这种方式确保了 on_irq 处理多个 EXTI 事件时能够逐一唤醒对应的 Future。
embedded_hal
exti.rs还提供了embedded_hal(略) 和 embedded_hal_async Trait的实现:
impl<'d> embedded_hal_async::digital::Wait for ExtiInput<'d> { async fn wait_for_high(&mut self) -> Result<(), Self::Error> { self.wait_for_high().await; Ok(()) } async fn wait_for_low(&mut self) -> Result<(), Self::Error> { self.wait_for_low().await; Ok(()) } async fn wait_for_rising_edge(&mut self) -> Result<(), Self::Error> { self.wait_for_rising_edge().await; Ok(()) } async fn wait_for_falling_edge(&mut self) -> Result<(), Self::Error> { self.wait_for_falling_edge().await; Ok(()) } async fn wait_for_any_edge(&mut self) -> Result<(), Self::Error> { self.wait_for_any_edge().await; Ok(()) } } 然后我们就可以愉快地使用:
button.wait_for_low().await啦!
总结
这个EXTI模块复杂性比较低,主要用于EXTI最低级也是最常用的用法:等待上升沿、等待高电平等。
但是由于stm32系列太多,又有很多EXTI15_10这种共用向量情况,embassy-stm32直接接管了所有EXTI中断(对于普通向量则一般使用bind_interrupts的模式),所以如果用户想用EXTI完成更加复杂和即时的操作,就只能关闭exti feature来关闭整个模块,或者关闭rt feature,自行管理启动和所有中断。
Embassy HAL设计了一套优秀的类型系统和HAL范式,为社区提供了学习榜样。其类型系统一部分在embassy-hal-internal中完成,一部分在HAL内部完成。通过这套类型系统和约束,我们可以避免很多恼人的错误,也能很大程度上简化代码(比如,永远不会设置错、忘设置IO AF,也不用再去查AF表)。
embassy-stm32 的创新主要是其codegen和metapac:使用了复杂的数据预处理和codegen实现了对stm32外设的包罗万象。stm32-data 通过来自CubeMX等的数据,生成带有元数据的PAC:stm32-metapac,避免了像stm32-rs 一样的重复和分散、不统一的代码。
当然,包罗万象是有代价的。我们日后可以详细聊聊。
在Embassy范式的影响下,我编写和维护了py32-hal 和 sifli-rs ,包含了对embassy大量的直接 Copy 借鉴,这两套hal分别针对Puya的低成本MCU如PY32F002和SiFli的M33蓝牙MCU SF32LB52。了解一下?
原文链接:https://decaday.github.io/blog/embassy-exti/
我的github: https://github.com/decaday


评论